CNC with Raspberry Pi, USBIP & Camera
Matthias Baldi, 12/31/2023
en

Since the end of 2022, I have been using a Genmitsu 3018 ProVer V2, primarily for engraving aluminum plates and also for laser engraving on wooden pieces. The initial problems were relatively easy to handle. To address the USB connection, I utilized my notebook with Candle to process the GRBL commands.
When it comes to monitoring the working machine, I was fortunate that the jobs only ran for 10 to 20 minutes initially. However, the laser introduced an additional security concern, necessitating the use of appropriate safety equipment such as glasses.
Therefore, I decided to use a Raspberry Pi to connect the CNC machine to the network and use it as a USB over IP server. This setup allows me to control my CNC jobs directly from my PC and monitor the process visually from a remote location with the official Raspberry Pi camera module.
More details and the code for this article you can find here:
matthiasbaldi/genmitsu-3018-toolsUsed Infrastructure
- Genmitsu 3018 ProVer V2
- Raspberry Pi 3 Model B (1GB) - newer models are no problem, older models may work.
- Raspberry Pi Camera Module V2
- Windows PC
Tested with the following software under Windows:
- LightBurn -> https://lightburnsoftware.com
- Candle -> https://github.com/Denvi/Candle
Preperations
- Install the latest Raspberry Pi OS Lite (32-bit) on the Raspberry Pi
- Enable SSH on your Raspberry Pi (Setup Wizard)
- Enable Camera on your Raspberry Pi (raspi-config)
- Connect the Raspberry Pi Camera Module V2 to the Raspberry Pi
- Connect it to your network
- Connect to your CNC machine per USB
- Clone the repository to your Raspberry Pi
“Important: Ensure that you wear the appropriate safety equipment and possess the necessary knowledge to use it. Laser devices, in particular, can cause serious injuries and health damage. I am not responsible for any damage or injuries resulting from the use of this tutorial.
Setup Raspberry Pi Camera Stream
To install the source code, fetch the prepared script from my Genmitsu 3018 Tools repository to your Raspberry Pi. In the following snippet, you can find the necessary commands to check out the repository and install the requirements.
Before starting the service, review the cnc-cam/cnc-cam.service file to adjust the paths as needed, in case you have cloned the repository to a different location.
Afterward, you can access the Raspberry Pi’s UI using the following URL: http://<RaspberryPi-IP>:8000.
When everything is functioning as expected, you should see a live stream from your CNC machine.
Below the live image, there will be some debug information about your USB devices.
You can later use this debug information in the USB over IP setup.
USB over IP Setup
Raspberry Pi
Now lets check if your Raspberry Pi can see your CNC machine which should now connected over USB with the Raspberry Pi. You need the device and bus ID from your connected CNC machine to bind it to the USB over IP service.
lsusbThe output should resemble the following:
Bus 001 Device 004: ID xxxx:yy00 QinHeng Electronics CH340 serial converter
Bus 001 Device 003: ID xxxx:yy01 Microchip Technology, Inc. (formerly SMSC) SMSC9512/9514 Fast Ethernet Adapter
Bus 001 Device 002: ID xxxx:yy02 Microchip Technology, Inc. (formerly SMSC) SMC9514 Hub
Bus 001 Device 001: ID xxxx:yy03 Linux Foundation 2.0 root hub
In this example, the first device corresponds to the CNC USB controller. The other devices include the USB hub and two Raspberry Pi devices, which, on this Raspberry Pi version, are connected via the USB controller.
You now need to note the bus and device ID of your CNC USB controller, which, in this example, is xxxx:yy00. This value will be required later to configure the systemd service with the correct values.
Next, use your previously cloned repository to install the USBIP service and all the required dependencies. With a systemd service, we can ensure that the USBIP service is started every time the Raspberry Pi boots up.
To ensure that the service takes the correct values, you need to edit the usbip/usbip.service file and replace the values behind #usbid= with your remembered values from above.
After that, you can copy the service file to the systemd service directory and start it.
Please check the status of our usbipd service with sudo systemctl status usbipd.service to ensure everything is running as it should.
Windows PC
On the Windows side it gets a bit more complicated, because the USB over IP tools are not available as a installable package or I didn’t find it out of a serious source. I used the USB IP implementation from vadimgrn (https://github.com/vadimgrn/usbip-win2). Because I do not regulary use Windows build tools I used the indows Sandbox feature to install the required dependencies and build the USB IP binaries.
Afterwards I copied the binaries to the Windows PC and installed the USB over IP driver.
    Directory: C:\Users\matth\Downloads\usbip-win_ude

Mode                 LastWriteTime         Length Name
----                 -------------         ------ ----
# ...
-a---          02.12.2023    22:30        1464832 usbip.exe
# ...“Attention: The UDE driver is not yet correctly signed. So check out the documentation for the Windows Test Signing Mode. In my opinion the easiest and most secure way would be to use any Linux Distro as a client too.
When the Raspberry Pi is now running, has an IP, the CNC is connected and the USBIP Daemon is running you can connect to the USB device from your Windows device.
./usbip.exe --debug attach --remote <RaspberryPi-IP> -b 1-1.3

# successful response:
succesfully attached to port 0
Connection from CNC software
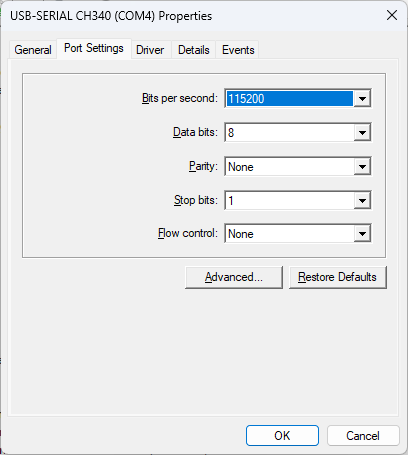
Check the baudrate from the attached USB COM device in the Windows device manager. The baudrate should be 115'200. This value should correlate with your used CNC machine if you may use an other than the Genmitsu 3018 ProVer V2.

LightBurn
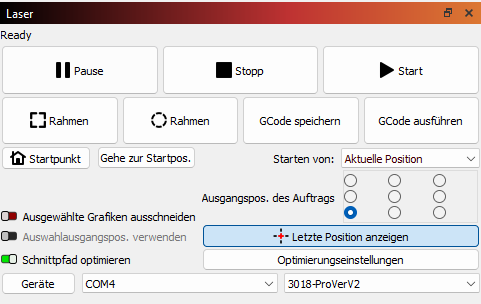
In LightBurn you can define a new device as GRBL device and connect it to the correct COM port, in my case COM4

Candle
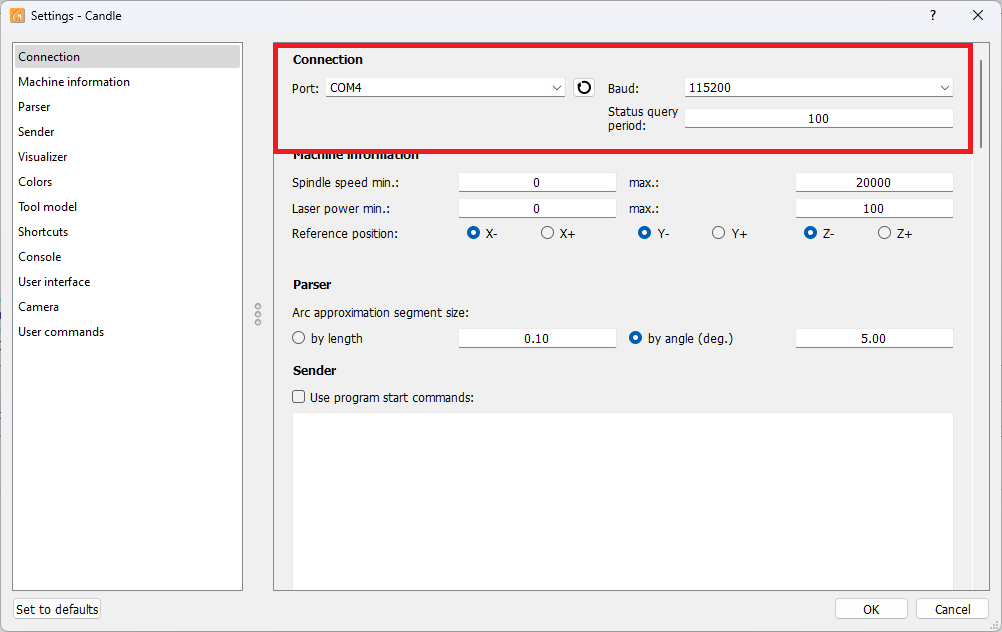
In candle it is only required to check the COM port (here COM4) settings, the baud rate should already be set correctly.

Conclusion
In conclusion, with this setup, you can easily connect your CNC machine to your network and operate it remotely. Currently, I’ve identified two issues with this configuration:
- The USBIP driver on Windows is not signed, which may require some time to address.
- I’ve observed issues with Windows hibernating mode when the remote USB device is still connected over USB over IP. Windows attempts to hibernate for a while and then proceeds to shut down the computer.
Despite these challenges, I am very satisfied with this setup. Now, I can operate my CNC machine from my main PC, located in another room, while still being able to monitor the process visually. This is a significant improvement, especially when using the laser engraver.
References
- https://github.com/matthiasbaldi/genmitsu-3018-tools
- https://www.raspberrypi.com/software/
- https://wiki.archlinux.org/title/USB/IP
- https://developer.ridgerun.com/wiki/index.php/How_to_setup_and_use_USB/IP
- https://github.com/vadimgrn/usbip-win2
- https://picamera.readthedocs.io/en/latest/recipes2.html#web-streaming